
|
|
#1
|
||||
|
||||
|
I know you all like to paint custom graphics,but hey heres a way to help.
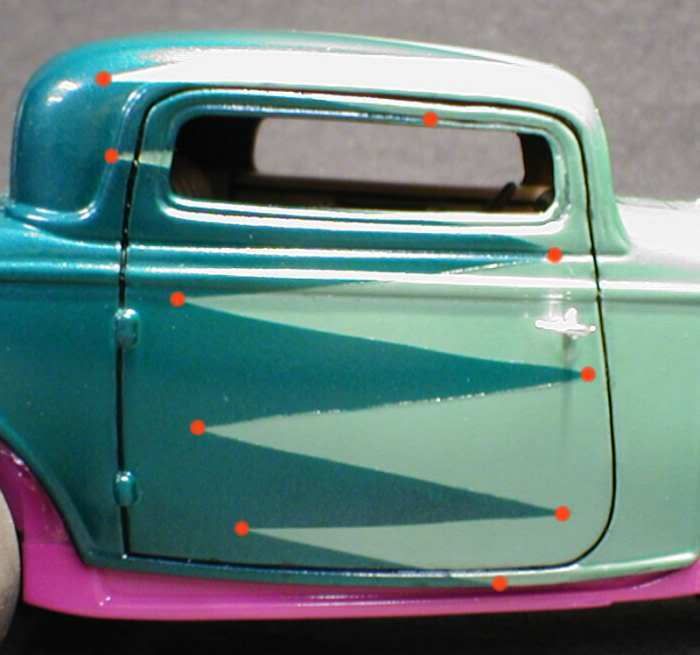
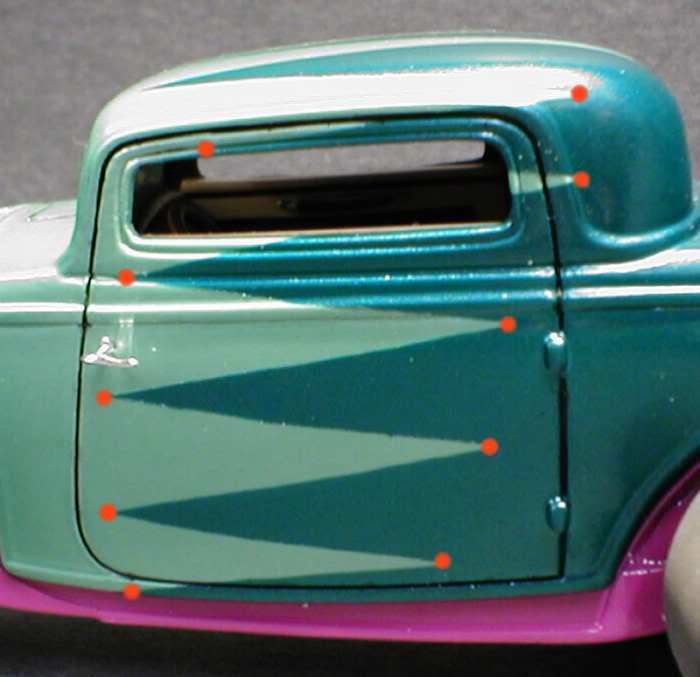
Supplies needed: masking tape, hobby knife, a piece of glass, and a light source. It's one thing to be able to make a mask for one side of a subject. It's another to have both sides the same. While you can cut a template out of paper I like to use tape for the actual mask and for the template. First take some tape. If you don't have wide enough tape you can stick some strips together to make it the required width. Here I am using Tamiya masking tape. It really is as good as every one says it is and I can't recommend it enough. Stick the tape on your subject and simply draw your graphic or pattern. You will have to excuse me as I finished this car and thought afterward I should share this trick with others.  Next, remove the tape from the subject and place it on a piece of glass. Glass is great because it's a perfectly flat surface and makes cutting the tape really easy. The knife just glides along. We'll have another use for it later on as well.  Once cut you have the option of using the negative or the positive of the pattern, what ever your design requires.  Remove the one side you don't require and flip the glass over. Cover your pattern with more tape as shown.  You can do this a few different ways but what you need to do is shine a light source through the glass so it reveals your pattern on the back side.  Trace this pattern and cut with your knife. You will now have a perfectly matched LH and RH mask. Depending on how square the glass is to the light your pattern might be off to one side or the other. This happened to me. I removed the top mask and placed it directly over the bottom mask just to show you that they do come out the same.  All you need to do now is position the mask on the car the same for one side as the other. Look for body lines, door handle locations anything that will help getting the masks positioned the same from one side to the other. On this particular car I needed a roof mask. I put the sides on first then made a roof mask to tie everything together. Look how close the red dots are from one side to the other. You can't get much closer than this!   Thanks To Brent From BMC For Making This |
|
#2
|
||||
|
||||
|
give brent my props. he wrote a nice tut.
__________________
thanks, MC4L  getting out of xmods: various motors custom F-150 now on ebay: http://cgi.ebay.com/xmod-F-150_W0QQi...QQcmdZViewItem i might have more too just contact me for a complete list of what i have left. |
|
#4
|
||||
|
||||
|
NICE TUT!
i like it very informative and creative! Stickied.
__________________
Posts Are Over Rated. One Should Be Judged On What They Say, Not How Often They Say It. Rules- http://www.xmodsource.com/forum/show...0724#post70724 ^^^read it er beat it^^^ "free the heel and ski for real" Fujica STX SLR still for sale. Looking to build computers by order. -Contact me on both. |
|
#5
|
||||
|
||||
|
Quote:
the one thing to remember when using two tone. DARK OVER LIGHT. you get better coverage with less coats. you can see the masking line on the graphic above and it runs from teal to seafoam. this means he sprayed the seafoam first,masked,cut and shot the teal.
__________________
Time you enjoy wasting is not wasted time.... |
|
#7
|
||||
|
||||
|
Quote:
if your doing custom graphics or flames you want to shoot your basecoat first and then after masking you want to shoot your flame/graphic color. if you add shading or accent colors you want to do it in the same order,light to dark. like a red/orange/yellow flame, you want to shoot yellow,orange then red with a fade between each color, yellow being at the tip of the flames.
__________________
Time you enjoy wasting is not wasted time.... |
|
#9
|
||||
|
||||
|
ive been into model cars since i was 10.im 27 now.
ive been doing bodywork/painting cars and motorcycles for about 12 years.
__________________
Time you enjoy wasting is not wasted time.... |
| Currently Active Users Viewing This Thread: 1 (0 members and 1 guests) | |
|
|