
|
|
|
#1
 02-13-2008, 08:00 PM
|
||||
|
||||
|
[moderator note]: This is a tutorial submission for the Xmods EvoTruck. Please place where you wish and remove this from the post. Or I will, either or..Thanks, Donzii.[/moderator note]
Articulation Tutorial for the Xmods Evolution Truck. Written by, Donziikid. You may use this tutorial on your forums/websites if you wish, just contact me for permission first. And if you dont ask for permission first .Watch out. I also understand that there are very many articulation tutorials out there, but everyone I have read/seen isn't as descriptive as this, or as thought out in the "English" speaking language. I haven't found one to date that isn't full of Leet. So I thought I would make one of my own that actually is understandable. Im sure everyone by now is sick and tired of the Stock Articulation on the Xmod Truck, so I would like to make it so you can get more bang for your buck. Heck, it only takes five minutes, and if you have the right tools and skills, its a lot faster than that! Tools you will need: -X-Acto knife (Or any small-sharp hobby-knife.) -Philips screw driver to disassemble your Xmod. Optional Tools: -Dremel with the sanding wheel. -Sandpaper. (I used 600Grit, then Fine, but you dont really need these two items.) CA Glue. General Facts: If you are actually going to attempt this Tutorial, you should at least know what you are dealing with. So I will list all the parts that you will be encountering along the way. -The part you will be cutting up, and modifying is called the Wishbone. These can be bought off Atomicmods if you want to go back to the original way you had your chassis, also an extra spacer for the F-150 chassis comes in the Blue body kit upgrade. But Im sure you wont want to go back to that. -Another part you will do some work to is the Wishbone Holder. 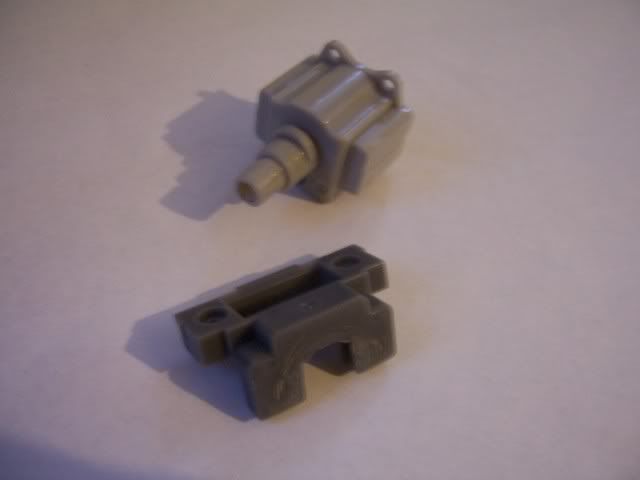 The wishbone is the lighter grey part on top, and the holder/u-joint is on the bottom part. And for your own electronic boards protection, make sure your batteries are removed, and the antenna is removed. This way you wont ruin your board, or the antenna while performing this modification. (I also re-move the RX chip so I do not harm anything electronically, or bend the pegs on it, if I accidentally touch it. Alright, lets get started! Enough of me rambling about all of this, it took a full page on Microsoft word already. Lol. Step One: If you look at a birds-eye-view of the chassis, you will see right behind the electronics cover there are dark grey spacers. And behind that there is going to be a grey spacer. The dark grey spacer is the Wishbone Holder and the light grey piece is the Wishbone. (Go figure. Common sense should tell you this, lol.) Now, what you need to do is remove the two screws on the top of the Wishbone Holder. Once those are removed stick them somewhere where you remember. (I personally have a Magnet Sculpture on my desk, and I remove the sculpture and place all my small screws on the magnet base. But other people will use egg-cartons, to extra motors to hold their screws. Just make sure you have something to hold them. Birds eye view screws: 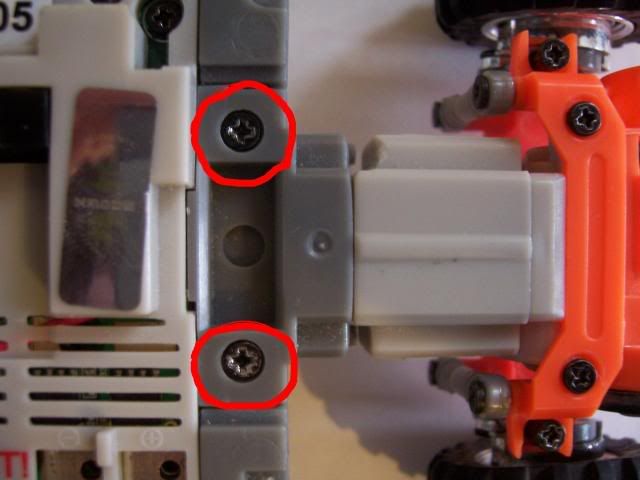 Now flip your chassis over so you can see the battery holder. (And when you do this, you should be able to see the battery holder, because there should be no batteries in your battery tray! Underside view screws: 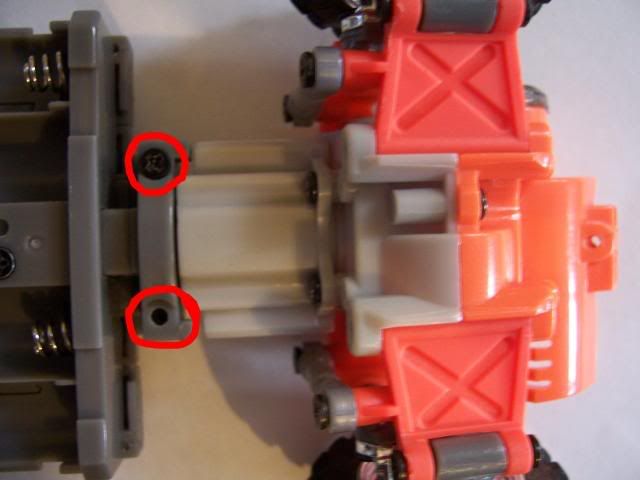 Step Two: Now that you have the rear part of your chassis off from the front half, we can really get to work. The grey piece that you now are holding in your hand can be set aside by your screws for right now (This is the U-Joint/holder). We will get back to it later, dont worry. (If you have been running your Xmod Truck for a long time now, you will see there are scratches on it from rubbing the other piece. We will soon fix that. Now pick up the rear part of your chassis and you will see the wishbone has two visible screws, and one hidden one. We will be taking all three of the screws off. For this I used just my regular stock screwdriver that comes with the chassis when you first buy your Xmod. It works perfectly for what we will be doing, and it can fit in that hole. But if you do have an after-market screwdriver, it will work just as well if it can fit in the hole. As soon as you have all three of the screws off of the Wishbone, you can set them where the rest of the screws are. These are the three screws I am talking about: The hidden screw: 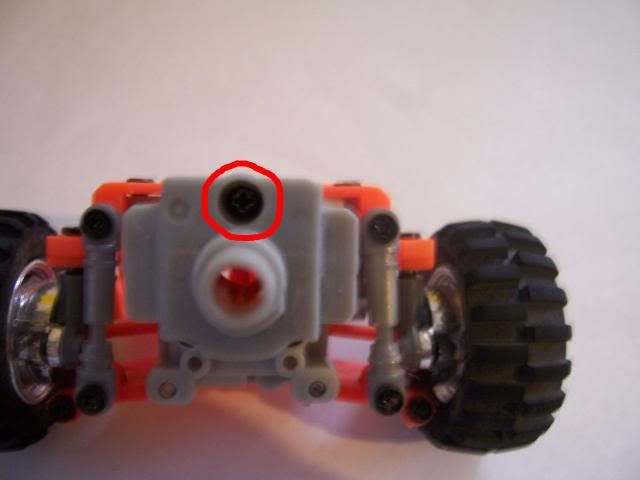 The two visible screws: 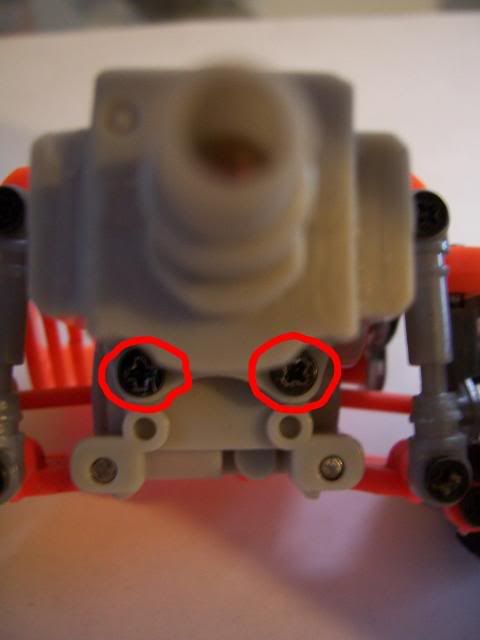 Step Three: Right now you are looking at a bare Wishbone. Congratulations, want a steak? Lol. If you look closely at the wishbone, there are two tabs on the side of the wishbone along with a large tab on the cylindrical part jutting out from the base of the wishbone. You will be cutting those tabs. This picture clearly illustrates the tabs on the side that you need to cut off, I do not have a picture of my own since I did this modification before making this tutorial, so I used one of Atomic Mods. Hope they don't mind. I kept the picture legal! :P 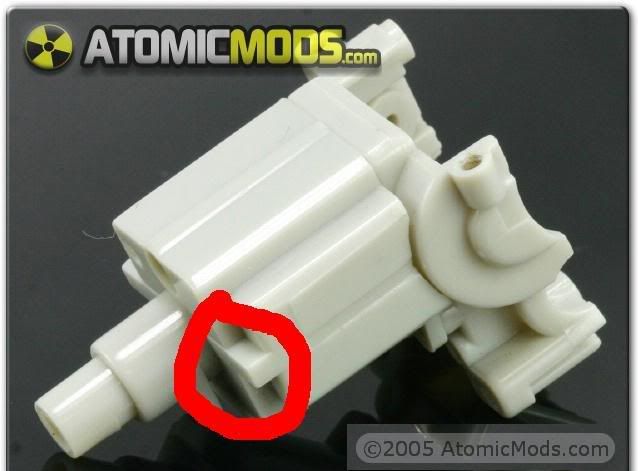 You will see that there are two tabs on each side of the base. These two will be completely cut off. If you have an X-acto knife, this will be a little tricky, and will take some time. Start cutting away at those tabs as close to the base of the Wishbone as you can. This way you wont have to sand so much. Step Four: Now for the tab on the cylindrical part! Start by taking a little triangle off of the edge of the tab. But only a little! If you cut too much off, the holder will not hold the rear end of your chassis to the rest of the chassis. (If you place the wishbone inside the holder before you start cutting it, you will see what I am talking about. If you cut too much off the wishbone will just slide right out making what you have already done, useless. So what we want to do is make it so you can cut just enough off to let it slide past the side posts of the holder, but not slide out of the holder its self to make it so the rear end will fall of from the rest of the chassis. Trust me, Ive done it. Its not fun. Lol.) Take little chunks off one at a time, and test it inside the holder. If it can slide farther than before, you have gained articulation. If you can swing the wishbone all the way around, you have probably ruined the wishbone. So get it to a point where you think is safe for you, and what you want. And call it good. Do not experiment with a part that you probably do not have duplicates of. Otherwise your chassis will not be able to be put back together and work. When you are done, it should look a little something like this. I shall get a better lit picture when I can, but you can see the tabs on the side are cut off, and the tab on the cylindrical part are trimmed/rounded. 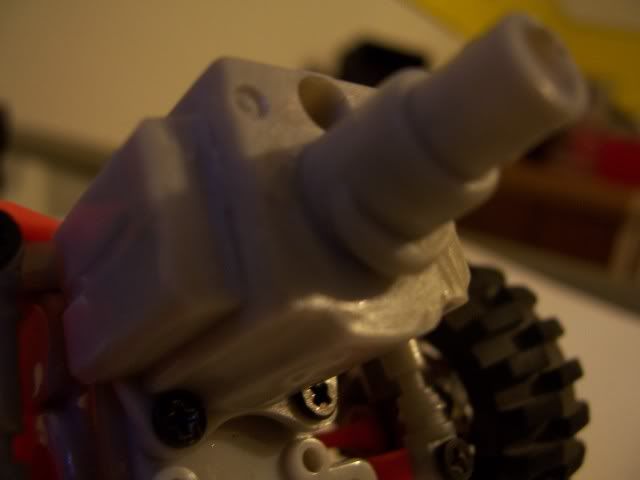 Step Five: Now, for the really easy part! Grab that sand-paper if you have decided to go that route and start to sand where the tabs that you cut off are. If you do this, you will make not look like you cut parts off. Now pick up that really dark grey piece (The Wishbone Holder) that we took off earlier. If you start to sand the part where the Wishbone hits, it will become smoother. This will make it a little smoother than it was before, and you will be able to turn the wishbone a little easier. Now for those wondering about the options I stated : With the dremel you can get this process done a lot faster and a lot easier. I actually did this with both an X-acto knife, and a dremel. I found the dremel easier, but it didnt turn out as clean as with an X-acto knife.\ You can repeat all the steps the same as above, but with a dremel. I really advise not using it, because it tends to be a lot harder, and more of a hack-job. Just remember to remove small parts at a time. And when working on the two tabs that you need completely off, dont cut into the base of the wishbone. That probably wont turn out good. Lol. Step Six: Reassemble everything you have taken apart, making sure that you put it back the right way, and tight so nothing will fall apart. The outcome from the Articulation Mod. The articulation is mainly used for off roading, and crawling around in your house when you need it. If you do this you will gain a lot of wheel area and can make your chassis do some awkward positions. I know I am currently satisfied with more articulation, but sometimes I do feel like going back. So I just swap out the Wishbone to a stock one. With this mod, you should get articulation close to this: 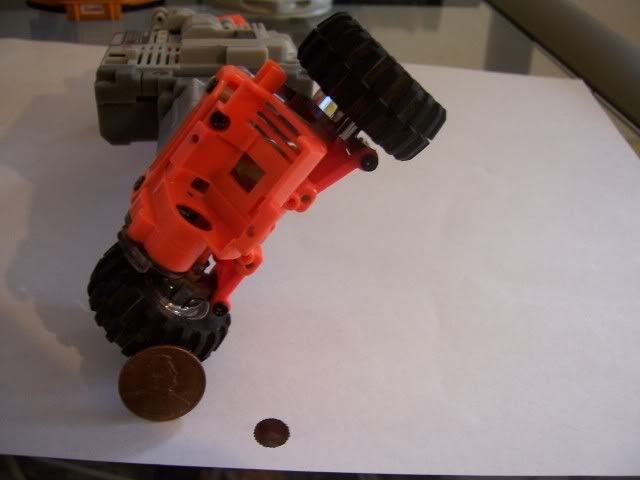 The dark circle around the far left tire, is a penny. Just for size comparison. Replacement parts incase you screw something up: Wishbone holder/U-joint: http://www.atomicmods.com/ProductInf...roductid=10548 Wishbone (F-150): http://www.atomicmods.com/ProductInf...roductid=10554 Wishbone (Hummer): http://www.atomicmods.com/ProductInf...roductid=12125 (The Wishbone Holder is the same on the F-150, and the Hummer. So you will not order the wrong part if you order a Holder. Just make sure you order the right Wishbone size for the chassis you have.) And remember, if you dont want to pay Atomic prices, go to the B/S/T thread here on Xmodworld, or another forum. A final step, if you decide to go this route. Some people sometimes like to have a lot of articulation in their Wishbone Chassis. So there is a certain thing you can do to fix this. XMDrifter comes up with a great point. Quote:
Thanks for the tip XMDrifter! Cheers, Donzii/Kyle. |
|
#2
02-13-2008, 08:17 PM
|
||||
|
||||
|
Excellent tutorial! Much more informative than the last one I read. Helps a new person have an expierence with a challenging but not to hard modification. Also helps that the parts are only a click away if you mess something up. I wish there were more tutorials like them.
|
|
#3
02-13-2008, 09:21 PM
|
||||
|
||||
|
Excellent tut. I prefer cutting the grey tabs off the thing that holds the wishbone in place. Then shaving the little box-like shape under the wishbone. With that mod that I use, I can turn the rear part of the chassis completely over and still be able to drive! Good tut tho Donzii.
__________________
Brushless RC18T, Brushless Micro DT, Midwest AeroStar .20, SCX10 Honcho, Duratrax 1/5 Firehammer MT, Traxxas Nitro 4Tec 3.3 |
|
#4
02-13-2008, 09:27 PM
|
||||
|
||||
|
Thank you to both of you. I understand there are many ways to do it, especially after I did this tutorial/did it to my wishbone, I'm sure I would have done it differently a second time..
__________________
XMS Rules & Guidelines | B/S/T Rules | How To Post Pictures Greyscale Racing Member
 The Collection: Mitsubishi Pajero | AE RC18MT TLMicroCrawler | Xmod ShowRoom | 'Yota XTruck "The fun begins when the pavement ends." |
| Currently Active Users Viewing This Thread: 3 (0 members and 3 guests) | |
|
|


 Linear Mode

