
|
|
#1
|
||||
|
||||
|
Well, this one has been a WIP since I started this little hobby of mine. I remember a looong time ago, when I was a total rookie, I started a tutorial service on DocDetroit's forum. There I was asked to make a tutorial for patter winding. I hadn't ever heard of it untill that day. So I researched and researched, and before I knew it, I discovered I had "the touch", lol. Now, I'm gonna try to show you how to pattern wind.
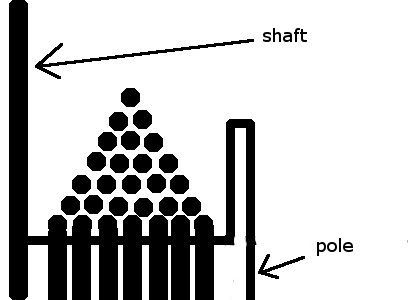
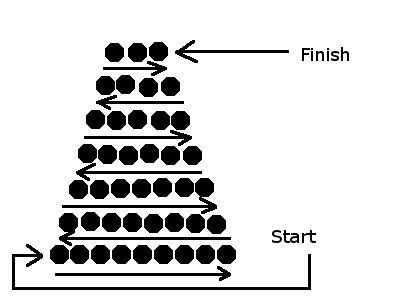
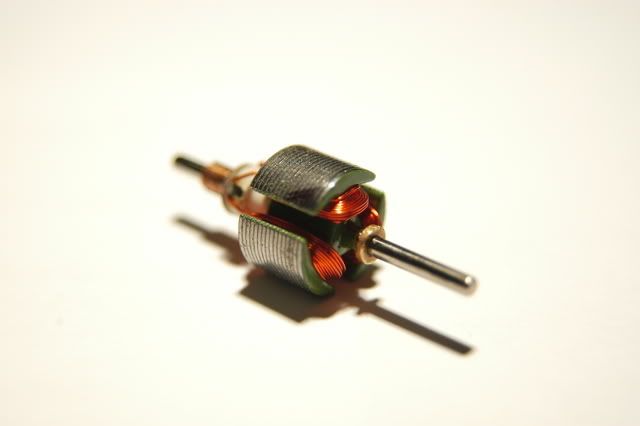
Now remember. Pattern winding is extremely tricky to get a hang of. I can only scratch the surface with explaining how to do it. The rest is trial and error. I highly reccomend trying this on a couple scrap armatures before doing it to a good arm. So what does pattern winding do for your motor? When companies make motors, they want bulk motors, and cheap motors. Something that they can mass produce. The wind quality is sub-standard, however. Sloppy winds make the current flow inprecise, and the arm is often inbalanced. Pattern winding lowers the resistance, and puts the current in a set pattern. Not only this, but it helps the motors magnets pick up the current. What you will need: Wire of desired thickness (remember, use thicker wire for lower turn motors, and thinner for higher turn motors) An armature with the wire removed First get your wind count down. If you want a 45t arm, go with a 10-9-8-7-6-5-4-3-2-1 pattern. If you want a 21t go with a 6-5-4-3-2-1 pattern. you can find this yourself with a calculator, or a pencil and paper. The pattern is entirely your choice, however, the most common and practical pattern is a pyrimid, like this:  Start your arm by wrapping the wire around one of the tabs (you don't want to pinch the tab of the commutater down because you'll be back for it). The tab should be between two poles. Wrap the wire around the pole (if the commutator is facing you, the pole to your right.) Wrap the wire around and around again. Work from the inside towards the shaft, to the outside to the walls of the pole). Make sure the wires are layed along, side by side. Once your done with bottom row, in whatever pattern you've chose (my bottom row is alway 9, no matter how many turns I'm doing) Now that your done with the bottom, lay the first wind of your next row on top of the bottom row. Make sure you lay it into the groove between the last two winds of the bottom row. Continue this till the other side of the row. Then, lay your first wind of the next row onto the row you just did. Repeat untill finished with your pattern. Then, run the wire to the commutator solder down, and move to the next pole. Here's what it should seem like:  Its very tough to explain in words so you'll have to work with me, lol. Be sure to also check out Mattdog's tut on how to wind motors (not pattern wind) Note, in his tut, he goes the opposite direction I do. You can do it whichever way you please. Whatever way is comfortable. http://www.xmodsforum.co.uk/showthread.php?t=2194 Once you get good:       I'd like to thank Donziikid for snapping the pics for me (I'm terrible with a camera), and Mattdog for the tutorial on motor winding. Later, RedSXmodder |
|
#4
|
||||
|
||||
|
__________________
YOU JUST LOST THE GAME!!!! im not as think as you drunk i am   53 chevy crawler 100% fast and the furious tokyo drift mustang 100% rsx rally car 80% nine in the quarter100% HMU on live folks MrHotRod1971 Last edited by zippo855; 07-16-2009 at 09:23 AM.. |
|
#7
|
||||
|
||||
|
they are correct
stickies are at the top of sections because they are important information most of the time. posting in one can't be considered bumping an old thread as they are stickied. the only thing that would be wrong with it is if it was a spam post that was made...
__________________
Keep smiling, people will wonder what your up to.  TEAM X.I. my massive collection of xmods http://www.xmodsource.com/forum/showthread.php?t=13526 |
 |
| Currently Active Users Viewing This Thread: 3 (0 members and 3 guests) | |
|
|